Sky Dart Controls
You can fly the Sky Dart with a keyboard and mouse, using an optional game controller (e.g. XBOX), with PC flight simulator joysticks (e.g. HOTAS), or with an OpenXR-compatible VR headset and hand-controllers.
All the Sky Dart user inputs (i.e. buttons, joysticks, etc.) are controllable in the cockpit using either your computer mouse, or your virtual VR fingers or hands. A subset of these inputs may be mapped or assigned to a game controller, joystick, or computer keyboard. Following are the default assignments for these inputs; you may customize them using a control panel in the Sky Dart cockpit.
Table of contents
Default Keyboard Map

The SHIFT key toggles the ALT CTRL button in the cockpit:
ALT CTRL Mode
ALT CTRL mode changes the behavior of some inputs:
| ALT CTRL ON | ALT CTRL OFF | |
|---|---|---|
| CAMERA INPUTS | pans L-R and U-D | moves L-R and F-B |
| JOYSTICK INPUTS | left-right is YAW | left-right is ROLL |
Default Game Controller Map (and Steam Deck)
Tungsten Moon supports many video game controllers in a generic way:
XBOX

PlayStation

Steam Deck

Default VR Controller Inputs
The default map should work for most OpenXR-compatible VR hand controllers.

The default VR controller input assignments may not be modified.
Default Mouse Inputs
If you are not using a VR headset, you can:
- Use the mouse LEFT button to press buttons in the cockpit.
- Hover the mouse cursor over the throttle, vernier throttle, or joystick, and hold the LEFT button move the control.
- Hover the mouse cursor over the throttle and use the mouse scroll wheel to change the throttle setting.
- HOLD the RIGHT button and move the mouse to pan the camera view direction.
- HOLD the RIGHT button while using the camera pan control (WASD or controller D-Pad inputs) to change the camera location.
The default mouse input assignments may not be modified.
Steam Deck Mouse Emulation
By default, tapping the Steam Deck touchscreen with your fingertip will emulate the mouse LEFT button press. Move your viewpoint using the camera movement buttons (blue) on the controller, then tap your finger to press the virtual cockpit buttons on the screen. You can also use your finger directly on the screen to move the throttle, vernier throttle, and joystick.
The Steam Deck is very customizable. For example, you can configure the trackpad to emulate a mouse with the RIGHT mouse button held down for very responsive camera view panning.
Configuring PC Flight Sim Hardware
Tungsten Moon Demo supports traditional PC joysticks quite well, but there are a few things to be aware of:
- If you are using a conventional PC joystick (typically used with flight simulators) with a throttle control, use the input mapping panel (in the cockpit) to map the THR A+ and THR A- to the throttle’s full and cut positions, respectively.
- We recommend assigning THR + and THR - to a pair of buttons or an up/down toggle on your PC joystick. This input is important for controlling the vernier throttle AND sets the vertical ascent or descent rate when you are in autopilot hover mode.
- Do NOT map the THR MAX, THR MIN, THR +, or THR - inputs to a PC throttle lever.
- If you configure a PC joystick, we recommend mapping all the available inputs to buttons or controls on the device. We do not recommend switching back and forth between a joystick and a game controller on the same computer. Choose one.
- Unlike your game progress, joystick or controller configurations are not shared between different machines using the same Steam account.
Other Equipment
Inertial Measurement Unit (IMU)
We introduced the Inertial Measurement Unit or IMU in the Basic Instruments section, but without explaining anything else about it.
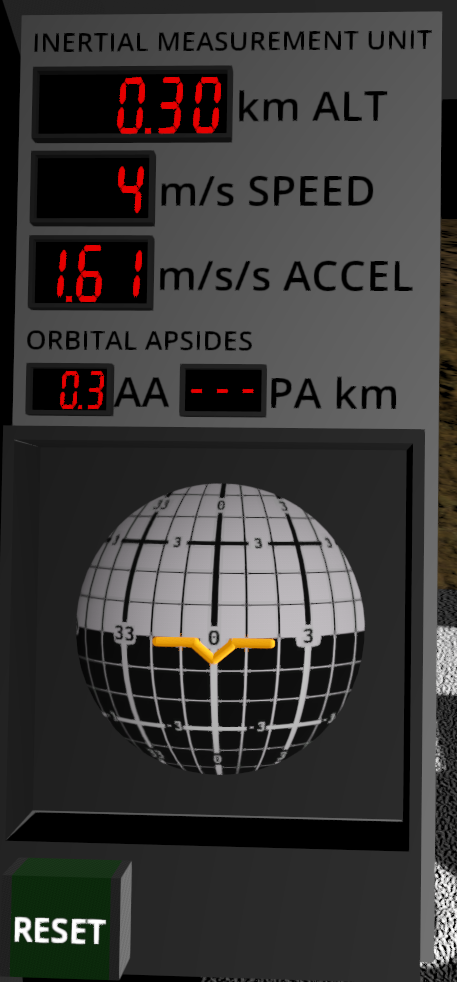
The IMU consists of accelerometers and gyroscopes that measure the acceleration vector of the Sky Dart, and any rotational velocity. On the surface, the IMU measures the rotation of the moon itself, and uses that to set the heading of the artificial horizon ball. The IMU uses the accelerometers to determine the direction of local vertical, and uses that to set the pitch and roll of the artificial horizon ball.
The IMU continually measures changes in velocity and rotation and updates the orientation of the ball, and displays the estimated altitude above the mean “sea level” altitude, the speed relative to the center of the moon, and the acceleration scalar. These are somewhat useful when you are more than 2000 meters above terrain and out of radar range.
The artificial horizon ball does not correct its rotation for the rotation of the moon, or the motion of the Sky Dart over the curved surface of the moon. This means that the local horizon angle will deviate from the artificial horizon angle as you move away from your starting position. Future versions of the IMU may correct this omission.
Orbital Apsides
The IMU is always computing the orbital apsides of the Sky Dart, assuming the throttle cut at that instant. For any ballistic (just gravity doing its thing with no artificial thrust) trajectory, the Sky Dart will follow an elliptical (or hyperbolic) path (orbit) around the moon. For short, low altitude flights, the elliptical path is very eccentric and lies mostly inside the moon itself, with only the tip of the ellipse above the surface. The shape of the piece that is above the surface is approximately parabolic, which is why a parabolic arc makes a good approximation for short flights.
The point on the orbital ellipse that is farthest from the center of the moon is the apoapsis (abbreviated AA). The point closest to the center is the periapsis (PA). Depending on what the Sky Dart is doing (ascending or descending), combinations of AA and PA mean different things:
| Type of Orbit | AA (apoapsis) | PA (periapsis) |
|---|---|---|
| stable elliptical | highest altitude | lowest altitude |
| elliptical (crash expected) | highest altitude | - - |
| Circular | same as PA | same as AA |
| Hyperbolic (escape) | - - | lowest altitude |
| Hyperbolic (escape if altitude increasing) | - - | - - |
| Hyperbolic (crash expected if altitude decreasing) | - - | - - |
An escape orbit will bring your spacecraft infinitely far from the moon after an infinite number of hours.
A crash expected orbit will eventually bring the Sky Dart to the surface of the moon at high speed, scattering bits of metal and flesh over the landscape. Intervention is required to avoid this outcome.
An elliptical orbit can mimic a hyperbolic orbit if the AA (apoapsis) value is higher than 99 (displays as - -). This is uncommon.
IMU Reset
When the ship is aloft, and stationary, press the RESET button to set the heading to zero and level the artificial horizon. This is useful for making a heading, pitch, or roll change, without reference to the actual horizon.
When you land, the IMU will automatically reset to show the correct heading and slope angle for your landing location.
Sky Dart Nameplate and Accessory Panel
The accessory panel is on the left side of the Sky Dart cockpit:
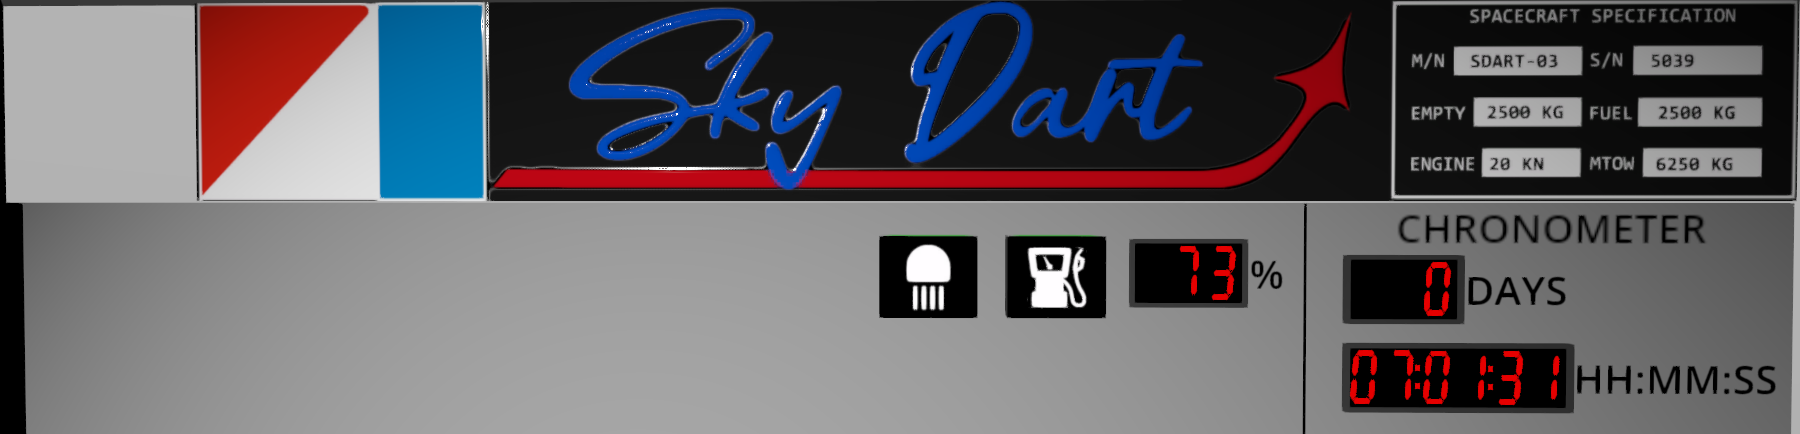
Landing Light
The button with a down-pointing headlight symbol toggles the exterior landing light. The light is aimed downward and a little forward, with a maximum range of 100 m. This is very useful for landing in complete darkness, and especially when no landing pad is nearby.
Fuel Gauge and Refill
Press the button with the “gas pump” symbol to refill the Sky Dart propulsion fuel tanks. This is only available when the Sky Dart is safely on the ground or on a landing pad. The display to the right shows the percentage of fuel remaining. When the fuel runs out, the main engine will stop firing; Sky Dart will fall out of the sky and crash, killing the occupant.
Chronometer
The chronometer is a clock that keeps track of your time on board the Sky Dart. The clock measures time in familiar units of hours, minutes and seconds, but the “DAYS” display increments with each revolution of the moon about its axis.
Days are ten hours long on Tungsten Moon. When the day count changes, the clock resets to midnight.
Reassigning Control Inputs
The input assignment panel is on the right side of the Sky Dart cockpit:
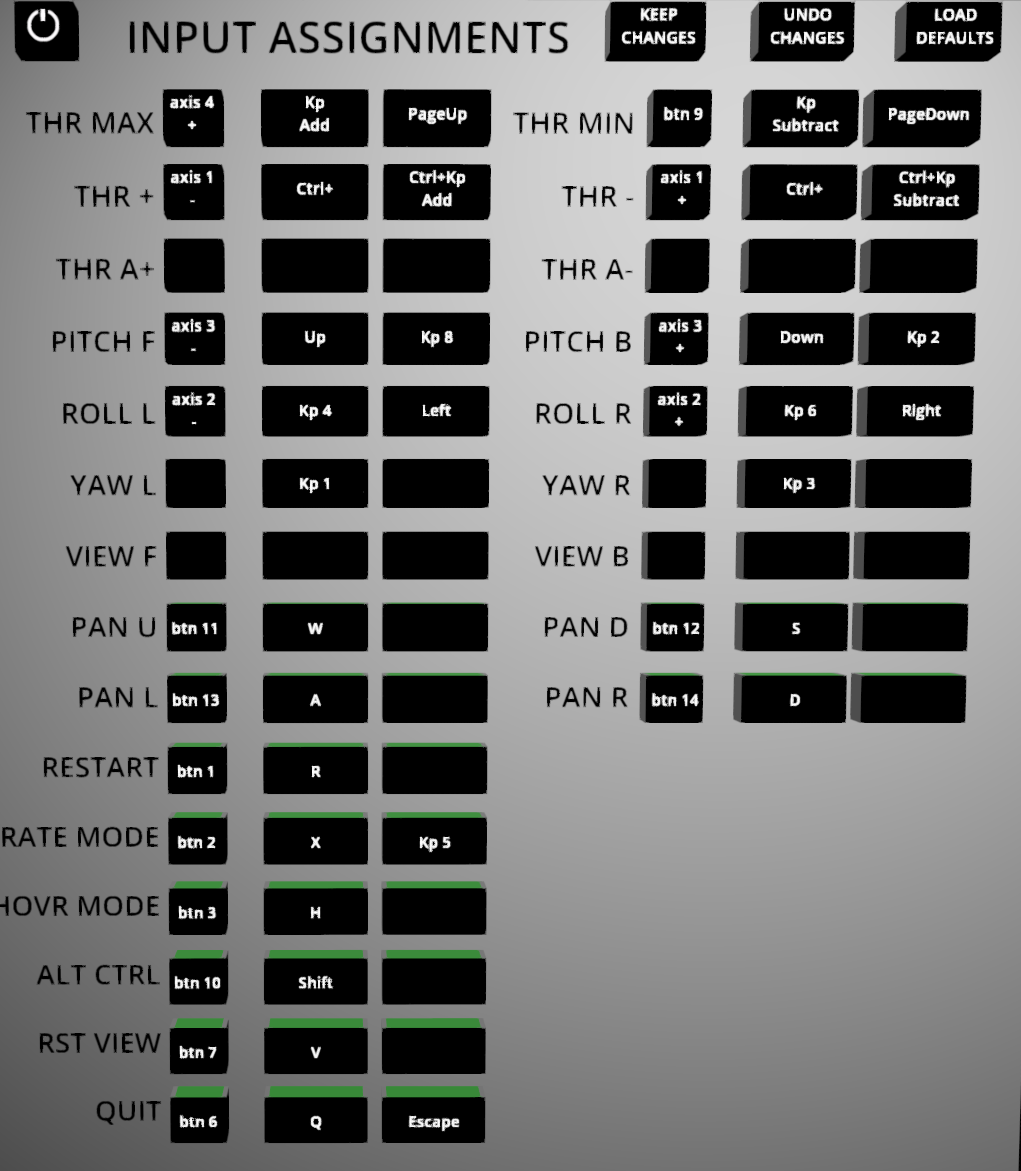
Use the input assignment panel to change the default buttons and joystick assignments on a game controller, or to assign the inputs to a PC joystick or computer keyboard.
Before you can use the panel, turn it on by pressing the power button in the upper-left corner of the panel.
Once the panel is on, you won’t be able to change your viewpoint. Be sure you can clearly see the whole panel before turning it on.
Each row of the panel is a different command. The commands at the top of the panel with two different names are typically analog inputs that can have a range of output values. For example, the THR + and THR - inputs correspond to the full up and full down inputs of the vernier throttle control (round knob). To assign the input to an analog control (like a joystick axis) you would use this procedure:
- Press (with your mouse or VR finger) the left-most square button. The button should illuminate and display the word “listen”.
- Move the joystick in the direction for that command until the legend on the button changes (e.g. “axis 1 -“).
- Press the button again to lock that setting.
- Repeat steps 1-3 for the right-most square button.
- If your chosen input device was already assigned to an input, it will clear the previous assignment and the corresponding button will illuminate to remind you that it should get a different assignment.
- Continue with any other inputs until they are all assigned.
Once the assignments are complete, the KEEP CHANGES and UNDO CHANGES buttons should be illuminated. If you are satisfied with the changes, press KEEP CHANGES, then turn off the panel using its power button.
If, instead, you want to return to the default input configuration, just press LOAD DEFAULTS, followed by KEEP CHANGES.
The square buttons are specifically for assignment to a game controller joystick, analog input, or button. The rectangular buttons are for assignment to keyboard buttons. Up to two different keyboard buttons and one game controller input may be assigned to each input.